Chapter 7 of 10Chương 7/10 9 min9 phút
Designing a glucose-sensing chipThiết kế chip đo đường huyết
A person with diabetes has to keep an eye on one number, the sugar level in the blood, and the usual way to read it is to prick a finger. Nanochap Electronics, a company that makes chips for medical devices, designs and sells a glucose-sensing chip for the monitors made to change that.7.1 The first two cases came from university labs; this one is a company’s product, made in volume. This chapter follows it from the need to a finished layout, the first six steps of chapter 2’s design flow. Chapter 8 follows it the rest of the way, to a sensor on someone’s arm.
Với người bệnh tiểu đường, lượng đường trong máu là con số phải để mắt tới thường xuyên, và cách đo quen thuộc là chích máu ở đầu ngón tay. Nanochap Electronics, một công ty chuyên làm chip cho thiết bị y tế, thiết kế và bán một con chip đo đường huyết dành cho những thiết bị ra đời để thay đổi điều ấy.7.1 Hai tình huống trước đến từ phòng thí nghiệm của các trường đại học; còn ở tình huống này, con chip là sản phẩm của một công ty, đã vào sản xuất hàng loạt. Chương này theo con chip từ nhu cầu ban đầu đến bản layout hoàn chỉnh, tức sáu bước đầu trong quy trình thiết kế (design flow) ở chương 2. Chương 8 đi tiếp chặng còn lại, cho tới khi nó thành một miếng cảm biến dán trên cánh tay người dùng.
In this chapter
Trong chương này
- Why a chip company starts from “which chip, and for whom?”
- How a continuous glucose monitor differs from a finger-prick meter
- What a sealed sensor asks of the chip inside it
- What each block of the chip does
- How the analog and digital work meet on one die
- Vì sao một công ty chip phải bắt đầu từ câu hỏi “làm chip gì, bán cho ai?”
- Máy theo dõi đường huyết liên tục khác máy đo chích máu ở chỗ nào
- Một miếng cảm biến kín đòi hỏi gì ở con chip bên trong
- Mỗi khối trong con chip làm việc gì
- Mạch analog và mạch digital gặp nhau trên cùng một die ra sao
Which chip to design, and who will buy it?
Làm chip gì, bán cho ai?
For a company, the first question is which chip to design, and who will buy it; how to design it comes after. It is a question of survival. A company can have the money and the engineers to make a chip and still fail, because it picked the wrong chip or found no one to sell it to.
Với một công ty, câu hỏi đầu tiên là thiết kế chip gì và bán cho ai; thiết kế thế nào là chuyện đến sau. Đó là câu hỏi sống còn. Có tiền, có kỹ sư, làm ra được chip mà chọn nhầm sản phẩm hay không tìm được người mua, công ty vẫn có thể thất bại.
Nanochap’s chips are for health care, a field that is going digital. With smartphones, cloud computing and telehealth, a medical reading no longer has to stay in the clinic: it can be recorded and sent to a doctor far away, who reads it and gives advice or changes a treatment. A measurement that once needed a visit, or a drop of blood, can become a steady stream of data, but only if a small device worn on the body can take it. That device needs a chip.
Chip của Nanochap dành cho y tế, một lĩnh vực đang chuyển đổi số. Nhờ điện thoại thông minh, điện toán đám mây và các nền tảng chăm sóc sức khỏe từ xa, số đo sức khỏe không còn phải nằm lại ở phòng khám. Kết quả đo có thể được ghi lại rồi gửi đi, để bác sĩ ở nơi khác đọc, khuyên người bệnh hay điều chỉnh cách chữa. Những phép đo trước kia buộc người bệnh phải đến tận phòng khám, hay phải lấy một giọt máu, nay có thể thành dòng dữ liệu liên tục, với điều kiện có một thiết bị nhỏ đeo trên người để đo. Thiết bị ấy cần một con chip.
A patch that measures continuously takes the place of finger pricks
Miếng dán đo liên tục thay cho những lần chích máu đầu ngón tay
A finger-prick meter gives one blood-sugar reading each time the user puts a drop of blood on a test strip. It hurts, the readings are few and far apart, and a check at night means waking up. Many meters can store their results and send them to a phone app,7.2 but every reading still costs a prick.
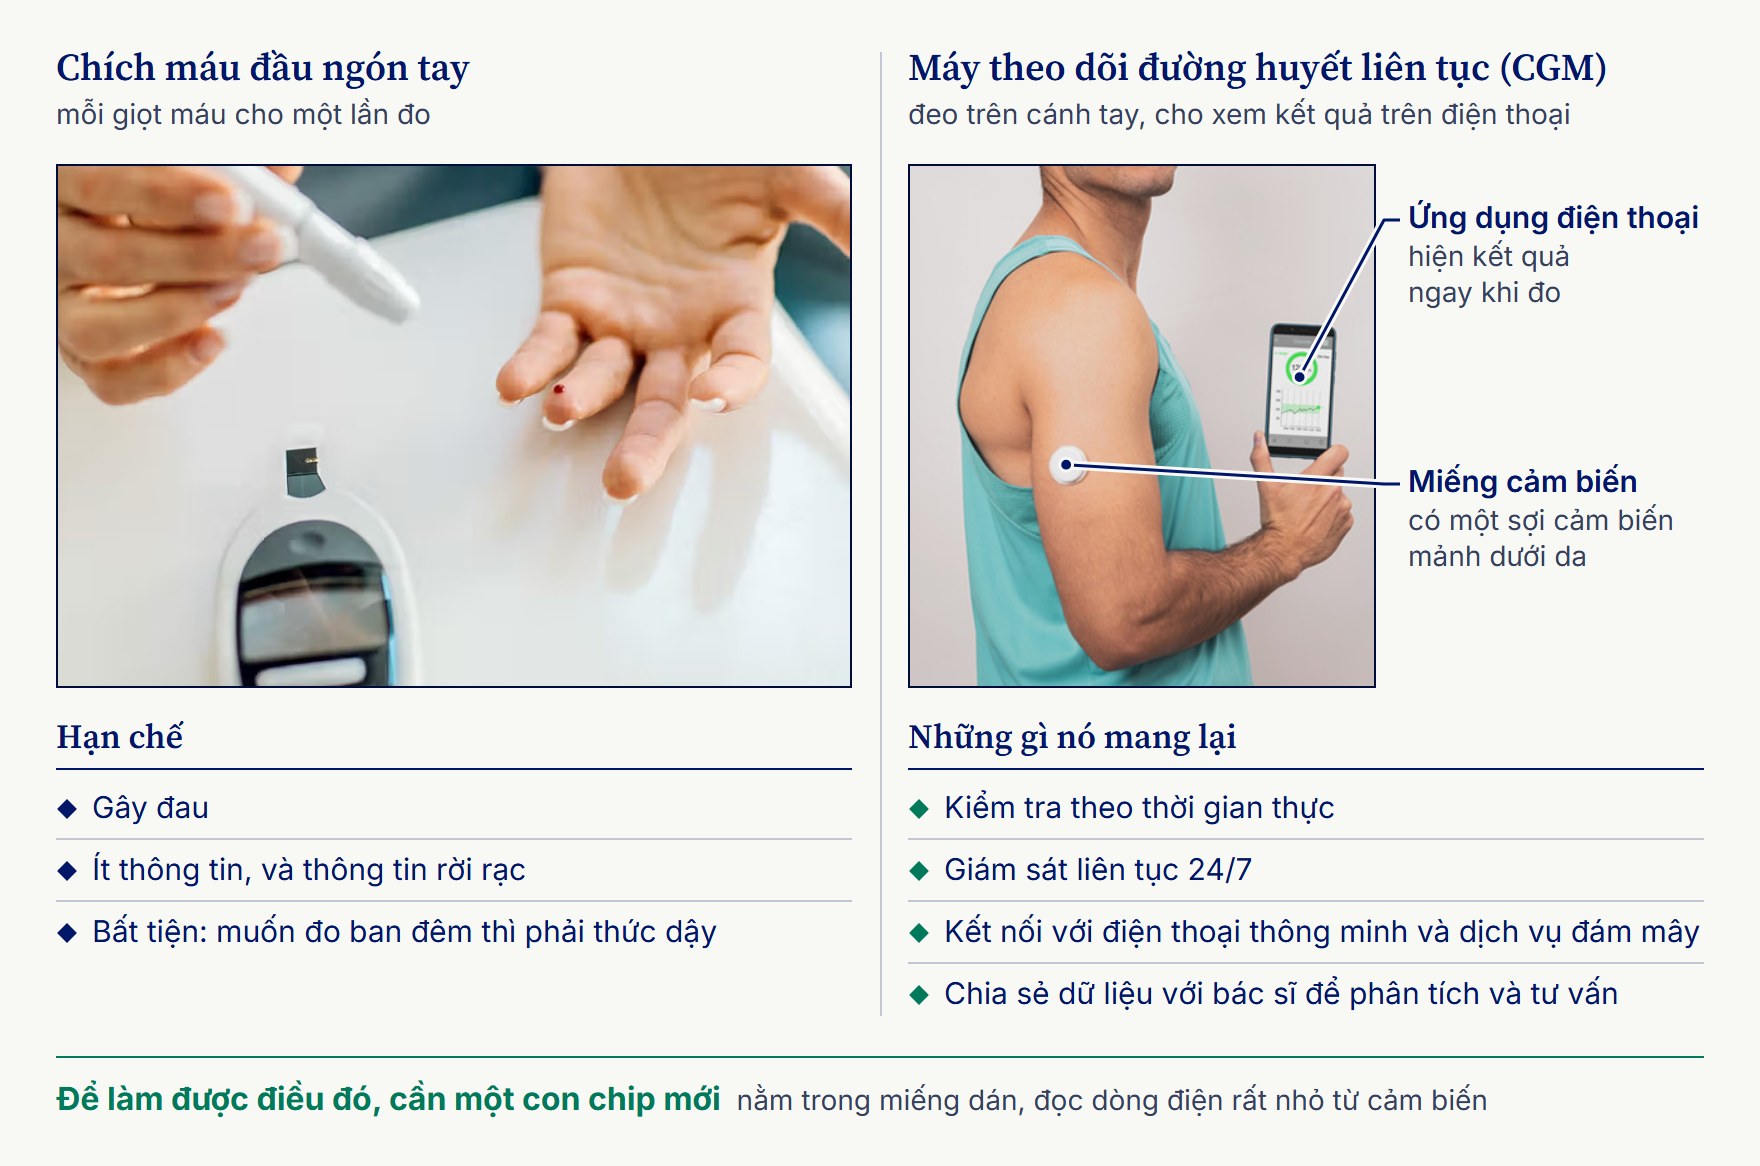
Máy đo đường huyết kiểu chích máu cho một kết quả mỗi lần người dùng nhỏ một giọt máu lên que thử. Chích máu gây đau, số lần đo ít và cách xa nhau, muốn đo ban đêm lại phải thức giấc. Nhiều máy đo nay đã lưu được kết quả và gửi sang ứng dụng trên điện thoại,7.2 nhưng lần đo nào cũng vẫn phải chích.
A continuous glucose monitor (CGM) works another way. It is a small patch worn on the arm, with a thin, flexible filament that sits just under the skin, in the fluid between the cells, outside the blood vessels.7.3 A needle puts the filament in and then withdraws.7.4 The filament carries the glucose sensor itself: an electrode coated with an enzyme. The enzyme reacts with glucose, and the reaction produces a tiny electric current, tens of nanoamps, that rises and falls with the sugar level.7.3 The patch takes a reading every one to five minutes, day and night, and in 2026 one sensor is worn for 10 to 15 days before it is replaced.7.5, 7.6
Máy theo dõi đường huyết liên tục (CGM) làm việc theo cách khác. Đó là một miếng dán nhỏ đeo trên cánh tay, có một sợi cảm biến mảnh và mềm nằm ngay dưới da, trong lớp dịch giữa các tế bào, bên ngoài mạch máu.7.3 Một cây kim đưa sợi ấy vào rồi rút ra ngay.7.4 Trên sợi ấy là chính cảm biến glucose (glucose sensor): một điện cực phủ enzyme. Enzyme phản ứng với glucose, sinh ra một dòng điện rất nhỏ, cỡ vài chục nanoampe (nA), lên xuống theo lượng đường.7.3 Miếng dán đo một đến năm phút một lần, cả ngày lẫn đêm, và tính đến năm 2026, mỗi cảm biến đeo được 10 đến 15 ngày rồi mới phải thay.7.5, 7.6
Today’s continuous monitors all put their sensor under the skin, most of them in a patch like this one, with an enzyme electrode. On 21 February 2024 the US Food and Drug Administration warned people not to use smartwatches or smart rings that claim to measure blood sugar without piercing the skin: at that date it had authorized none of them.7.7
Máy theo dõi đường huyết liên tục ngày nay đều đặt cảm biến dưới da, phần lớn là miếng dán như thế này, với điện cực phủ enzyme. Ngày 21/2/2024, Cơ quan Quản lý Thực phẩm và Dược phẩm Hoa Kỳ (FDA) khuyến cáo người dân không dùng đồng hồ hay nhẫn thông minh được quảng cáo là đo được đường huyết mà không cần chích qua da. Tính đến ngày ấy, cơ quan này chưa cấp phép cho thiết bị nào như thế.7.7
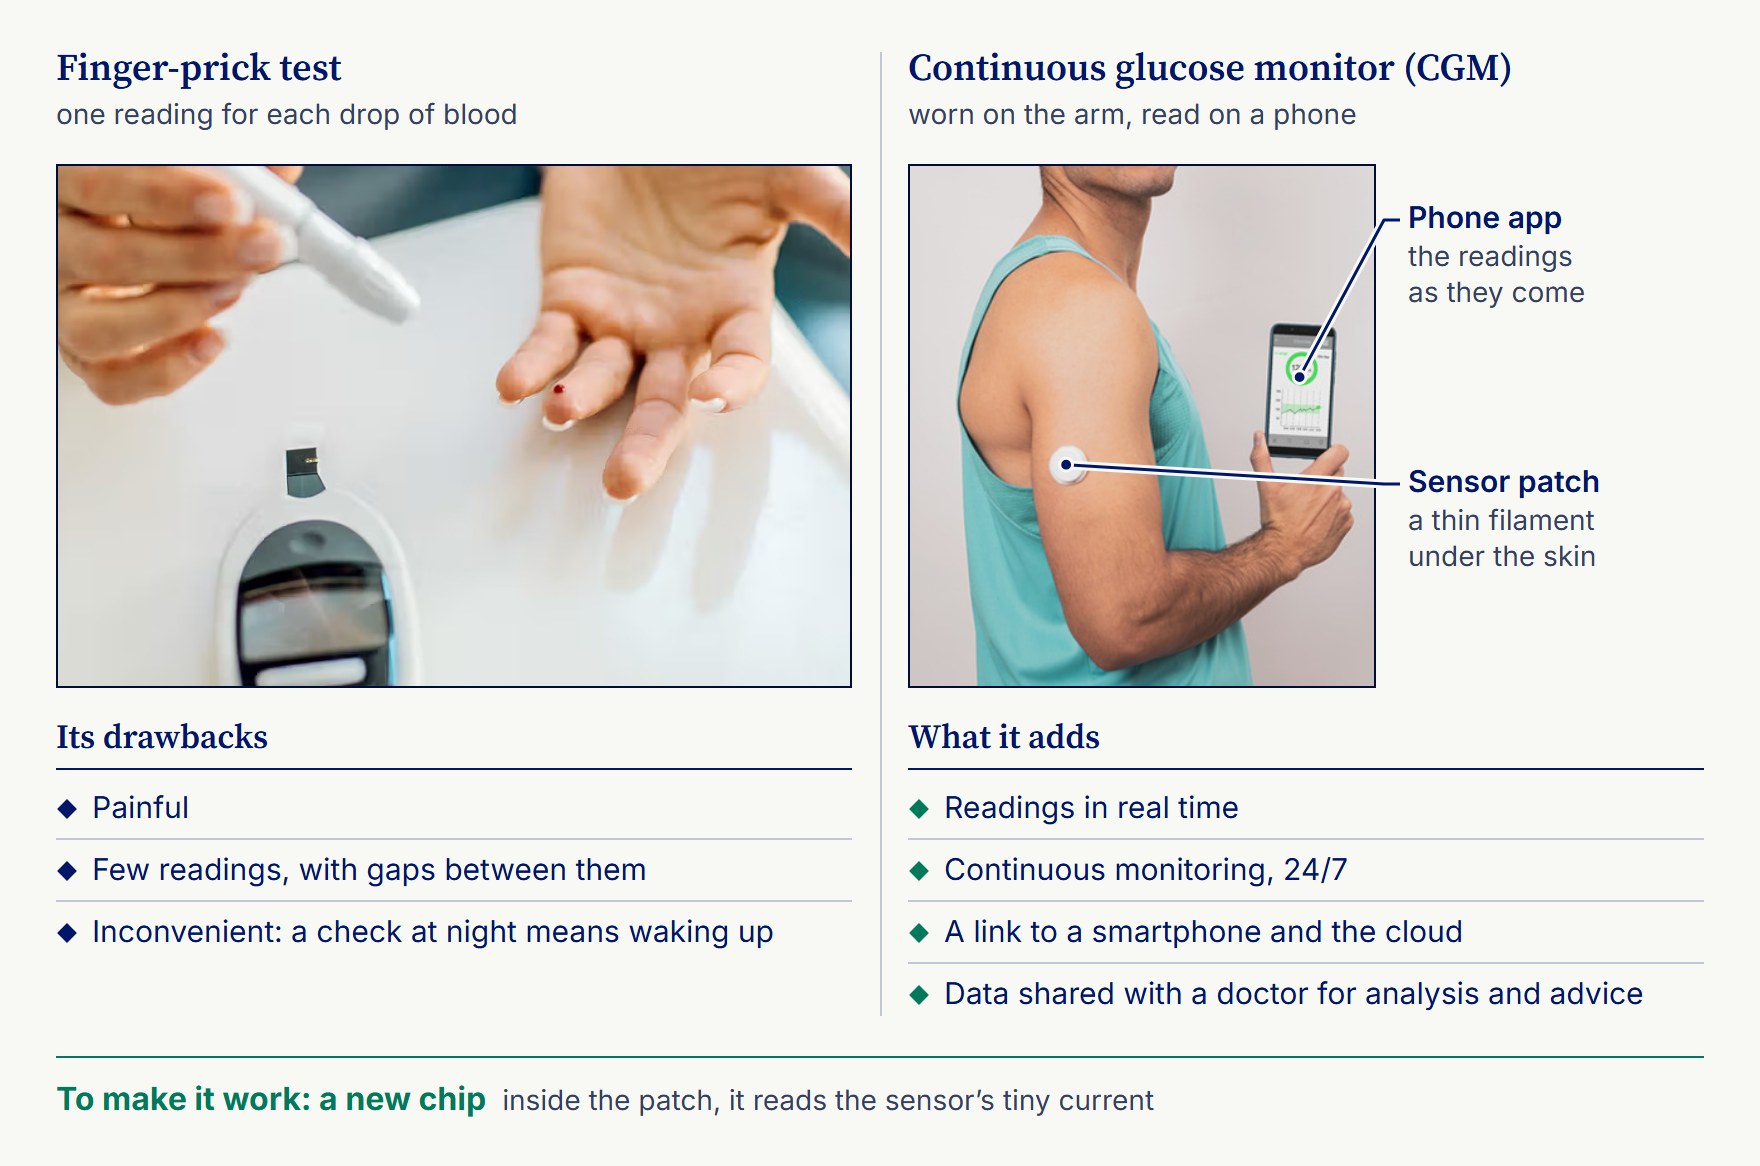
Where a meter gives a few numbers a day, the monitor gives a curve. Each reading reaches the phone as soon as it is taken, and the data can be shared with a doctor for analysis and advice. Doing all that from a small, sealed patch takes a chip designed for the job.
Máy đo chích máu cho vài con số mỗi ngày; máy theo dõi liên tục cho cả một đường cong. Mỗi kết quả đến điện thoại ngay khi vừa đo xong, và dữ liệu có thể chia sẻ với bác sĩ để phân tích, tư vấn. Muốn làm được ngần ấy việc từ một miếng dán nhỏ và kín, cần một con chip thiết kế riêng cho nó.
What the patch asks of its chip
Miếng dán đặt ra những yêu cầu gì cho con chip
A patch worn around the clock sets hard terms for its chip. The user has to be able to shower and exercise with it on, so it must be waterproof, and a sealed, waterproof patch cannot be opened to change its battery. The chip must therefore run for the whole life of the sensor on one battery. Nanochap publishes no battery-life figure for its chip.
Một miếng dán đeo suốt ngày đêm đặt ra những điều kiện khắt khe cho con chip bên trong. Người dùng phải tắm rửa, tập thể dục được khi đang đeo, nên thiết bị phải chống nước; mà đã kín nước thì không mở ra thay pin được. Vì vậy con chip phải chạy hết vòng đời của cảm biến chỉ với một viên pin. Nanochap không công bố thời lượng pin cho con chip của mình.
Running that long on a small battery means drawing very little power, and that is where the design gets hard. A circuit that does the same job on less energy tends to lose accuracy or speed, so each block has to be designed to keep its performance while its power consumption stays as low as it can go.
Chạy lâu như thế bằng một viên pin nhỏ nghĩa là chip phải tiêu thụ rất ít điện, và cũng từ đây thiết kế bắt đầu khó. Làm cùng một chức năng với ít năng lượng hơn, mạch thường kém chính xác hoặc chậm đi. Vì vậy khối nào cũng phải thiết kế sao cho giữ vững hiệu năng trong khi công suất tiêu thụ xuống thấp nhất có thể.
The signal is just as hard. A current of a few tens of nanoamps has to be measured precisely, without drifting, for as long as the sensor is worn, on very little power, and inside a package small enough to fit in the patch.
Tín hiệu cũng khó không kém. Dòng điện chỉ vài chục nA phải được đo thật chính xác và không “trôi” trong suốt thời gian đeo cảm biến, với rất ít điện năng, còn con chip đã đóng gói phải đủ nhỏ để nằm gọn trong miếng dán.
Which blocks the chip needs, and how they connect
Con chip cần những khối nào, và các khối nối với nhau ra sao
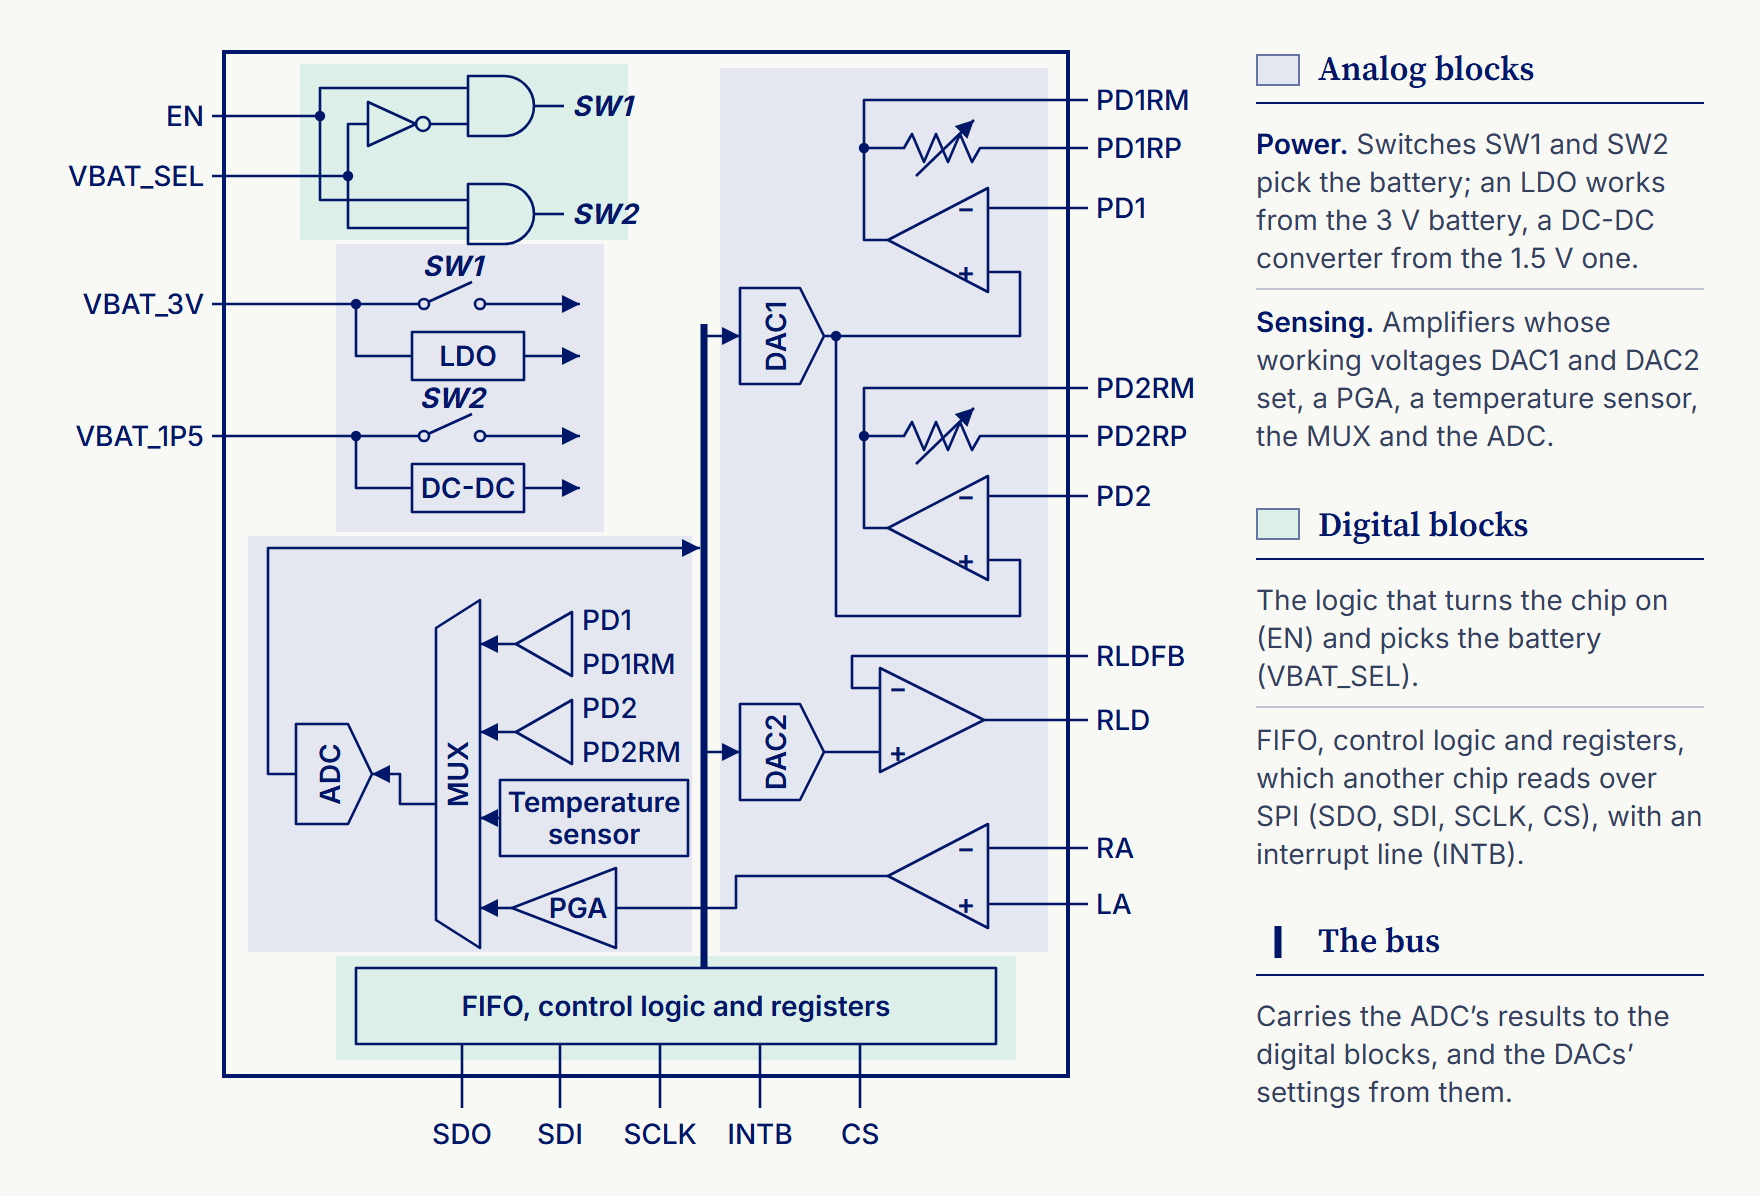
The chip needs two kinds of blocks: analog ones that power it and read its sensor, and digital ones that store the readings and pass them to another chip, with a bus between the two. The patch’s requirements make up the chip’s specification, the first step of chapter 2’s flow. What Nanochap built to them is an analog front end: the part of a device that sits between the sensor and the rest of the electronics, reading the sensor’s tiny signal and turning it into numbers. The second step, the chip’s architecture, sets down those blocks and their links as a block diagram; plate 7.2 is this chip’s, redrawn from Nanochap’s own.
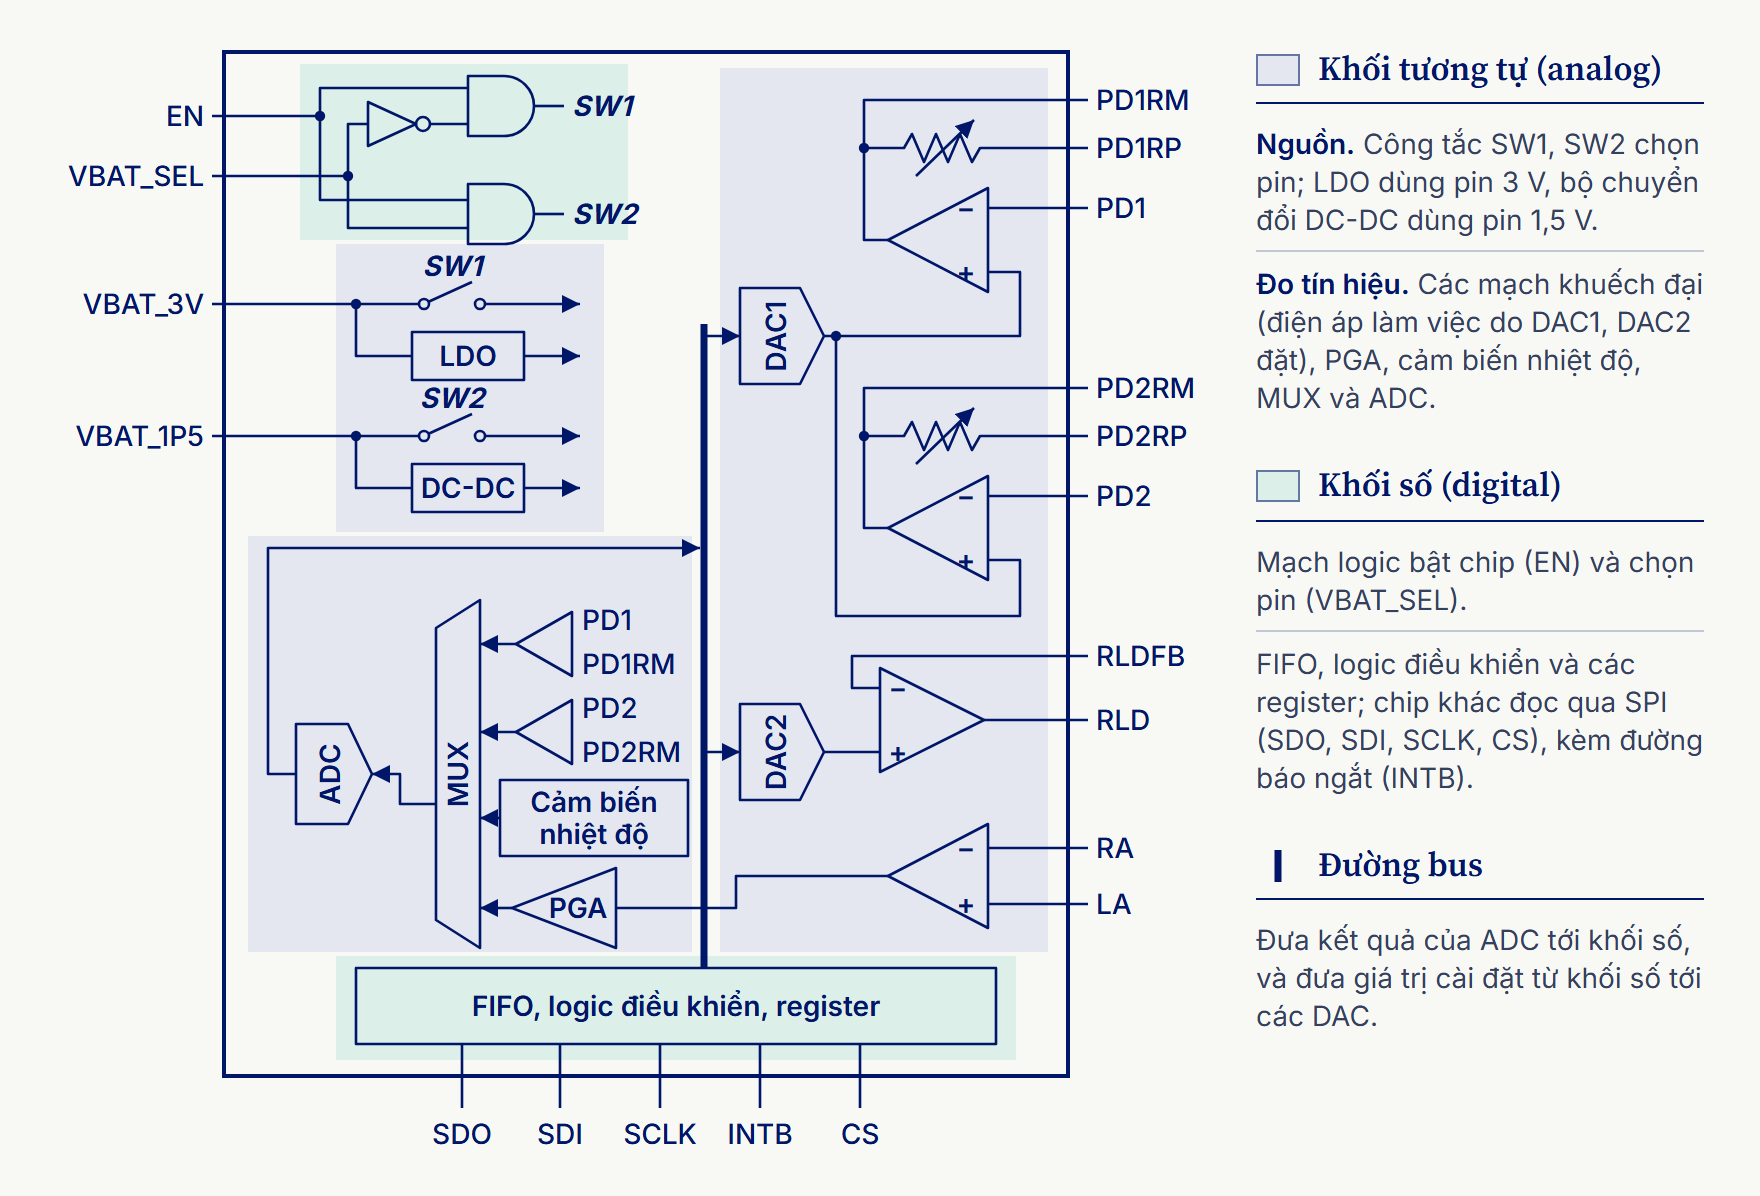
Con chip cần hai loại khối: khối tương tự (analog) để cấp nguồn và đọc cảm biến, khối số (digital) để lưu kết quả đo rồi gửi sang chip khác, giữa hai bên là một đường bus. Những điều kiện mà miếng dán đặt ra hợp lại thành yêu cầu kỹ thuật (specification) của con chip, bước đầu tiên trong quy trình ở chương 2. Con chip Nanochap thiết kế theo các yêu cầu này là một khối tiền xử lý tín hiệu tương tự (analog front end): phần nằm giữa cảm biến và các mạch điện tử còn lại của thiết bị, đọc tín hiệu cực nhỏ từ cảm biến rồi đổi nó thành con số. Bước thứ hai, kiến trúc chip, ghi các khối ấy cùng cách chúng nối với nhau thành một sơ đồ khối; hình 7.2 là sơ đồ khối của con chip này, vẽ lại theo sơ đồ của Nanochap.
The analog blocks, shaded blue, handle voltages and currents that vary smoothly. Two switches, set by a little logic, connect the chip to whichever cell it runs from. With a 3 V cell, a low-dropout regulator (LDO) brings the voltage down for part of the chip; a 1.5 V cell goes through a DC-DC converter instead. An electrochemical sensor such as the glucose filament is read by holding its electrode at a set voltage and measuring the current that flows. In the diagram that falls to the input amplifiers, whose working voltages two digital-to-analog converters (DACs) set.
Khối analog, tô xanh lam, xử lý điện áp và dòng điện biến thiên liên tục. Hai công tắc, do một mạch logic nhỏ điều khiển, nối con chip với viên pin đang dùng. Với pin 3 V, một LDO (low-dropout regulator) hạ điện áp xuống cho một phần con chip; còn pin 1,5 V thì qua một bộ chuyển đổi DC-DC. Muốn đọc một cảm biến điện hóa như sợi cảm biến đường huyết, mạch phải giữ điện cực ở một mức điện áp định sẵn rồi đo dòng điện chạy qua. Trên sơ đồ, việc ấy thuộc về các mạch khuếch đại đầu vào, có điện áp làm việc do hai DAC (digital-to-analog converter) đặt.
Some pins carry the names used for the electrodes of an electrocardiogram (ECG): RA, LA and RLD. Nanochap sells the chip for electrochemical sensors, though, and lists lactic acid, uric acid, ketones, cholesterol and creatinine beside glucose, for continuous monitors and for sweat sensors.7.8 A multiplexer (MUX) passes the signals one at a time to a single analog-to-digital converter (ADC), which turns each into numbers. They come from the input amplifiers, from an on-chip temperature sensor, and from a programmable gain amplifier (PGA) that amplifies what arrives on the RA and LA pins.
Một số chân mang tên các điện cực của điện tâm đồ (ECG): RA, LA và RLD. Dù vậy, Nanochap bán con chip này cho các cảm biến điện hóa, và kể ra những chất nó đo được: ngoài glucose còn có axit lactic, axit uric, thể ceton, cholesterol và creatinine, cho cả máy theo dõi liên tục lẫn cảm biến mồ hôi.7.8 Một MUX (multiplexer) lần lượt đưa từng tín hiệu vào một ADC duy nhất để đổi thành con số. Các tín hiệu ấy đến từ các mạch khuếch đại đầu vào, từ cảm biến nhiệt độ đặt ngay trên chip, và từ một PGA (programmable gain amplifier), mạch khuếch đại tín hiệu đi vào hai chân RA, LA.
The digital blocks, shaded green, work with ones and zeros. They switch the chip on and choose the battery, and they hold the ADC’s results in a first-in, first-out (FIFO) memory, with control logic and registers, until another chip reads them out through the Serial Peripheral Interface (SPI) pins the diagram shows. A bus down the middle carries the results from the ADC to the digital side, and the settings for the DACs back the other way.
Khối digital, tô xanh lục, làm việc với tín hiệu 0 và 1. Chúng bật chip, chọn pin, rồi giữ kết quả của ADC trong bộ nhớ đệm FIFO, cùng logic điều khiển và các register, cho tới khi một chip khác đọc các kết quả ấy qua các chân SPI vẽ trên sơ đồ. Đường bus chạy dọc ở giữa đưa kết quả từ ADC sang phía digital, và đưa các giá trị cài đặt cho DAC theo chiều ngược lại.
These blocks are common ones: amplifiers, converters, a multiplexer, a small memory. The difficulty is making each one precise enough for a current of a few tens of nanoamps while the whole chip draws next to nothing. Nanochap sells the chip as the NNC_BMS003 and publishes the features below.7.8
Các khối ở đây đều quen thuộc: mạch khuếch đại, bộ chuyển đổi, bộ chọn kênh, một bộ nhớ nhỏ. Điều khó là làm cho từng khối đủ chính xác để đo dòng điện chỉ vài chục nA, trong khi cả con chip gần như không tốn điện. Nanochap bán con chip này với tên NNC_BMS003 và công bố những thông số dưới đây.7.8
| Nanochap’s glucose-sensing front end (NNC_BMS003) | |
|---|---|
| Power | A 1.5 V or 3 V cell |
| Current while measuring | Under 15 µA at 1.5 V, under 12 µA at 3 V |
| Sensors it reads | Three- or four-electrode sensors |
| Analog-to-digital converter | 16-bit |
| Size | 2.4 × 2.48 mm as a wafer-level chip-scale package (WLCSP), the size of the die itself; also made in a QFN |
| Link to another chip | SPI, as its block diagram shows |
| Status | In mass production by 20247.9 |
| Khối tiền xử lý đo đường huyết của Nanochap (NNC_BMS003) | |
|---|---|
| Nguồn điện | Pin 1,5 V hoặc 3 V |
| Dòng tiêu thụ khi đo | Dưới 15 µA ở 1,5 V, dưới 12 µA ở 3 V |
| Cảm biến đọc được | Cảm biến ba hoặc bốn điện cực |
| Bộ ADC | 16 bit |
| Kích thước | 2,4 × 2,48 mm khi đóng gói theo kiểu WLCSP (wafer-level chip-scale package), đúng bằng kích thước die; ngoài ra còn có bản đóng gói QFN |
| Kết nối với chip khác | SPI, như sơ đồ khối thể hiện |
| Tình trạng | Đã vào sản xuất hàng loạt tính đến năm 20247.9 |
Two design tracks meet on one die
Hai nhánh thiết kế gặp nhau trên cùng một die
Once the block diagram is fixed, the work splits into two tracks (plate 7.3), the two kinds of design this book has followed so far. Analog design works at the transistor, as in chapter 5. Each circuit is drawn as a schematic, the size of every transistor in it is chosen by the designer, and the circuit is simulated to check that it does its job, for instance that a feedback loop stays stable. Then it is laid out by hand, shape by shape, a job of its own called analog layout, and simulated again with the layout’s wiring included.
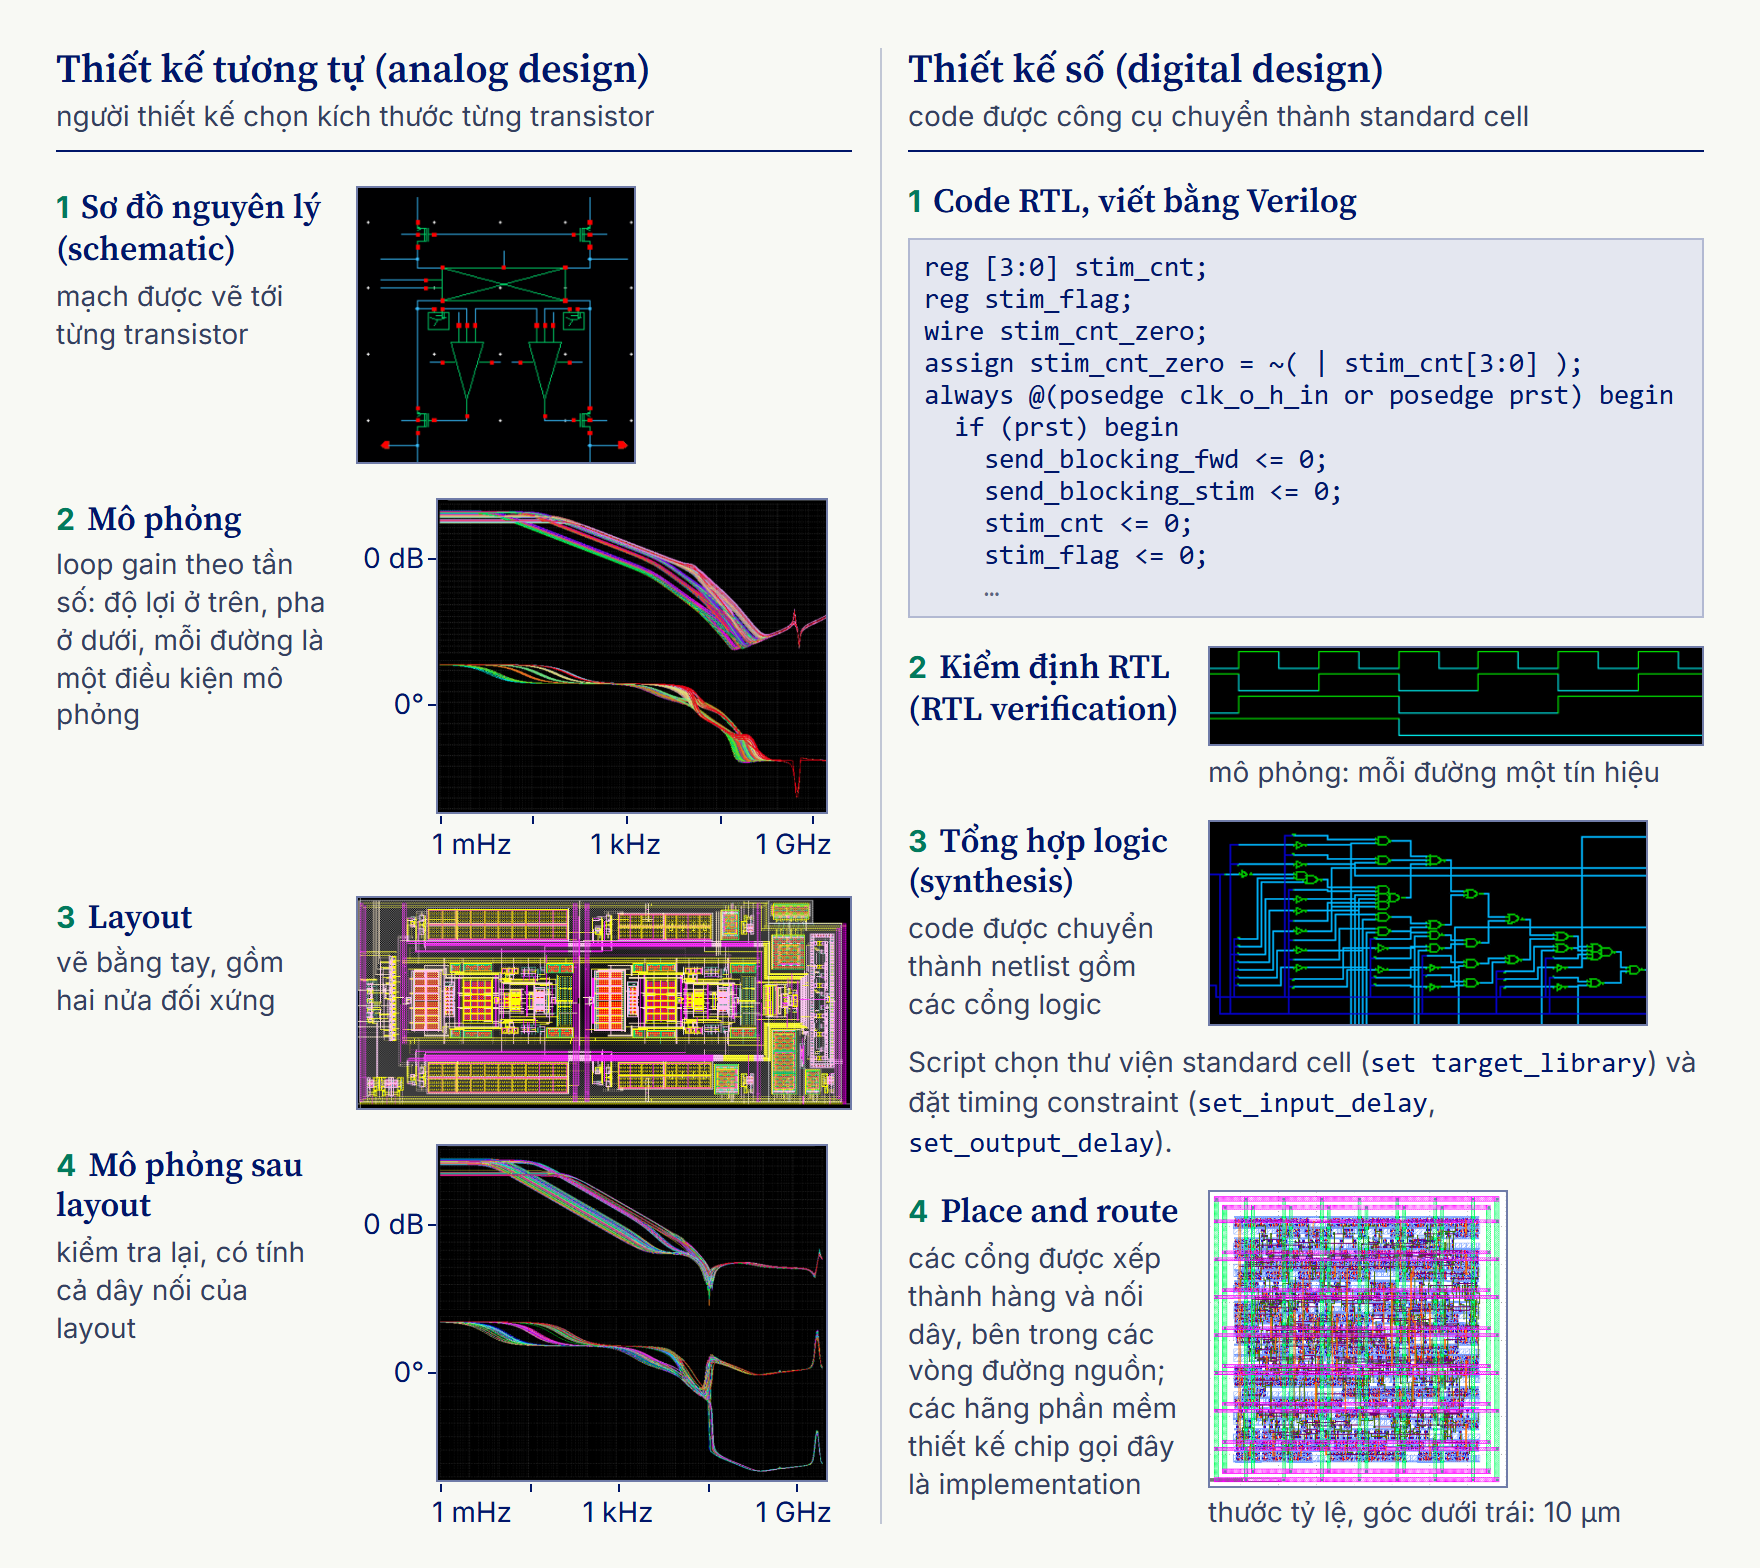
Khi sơ đồ khối đã chốt, công việc tách làm hai nhánh (hình 7.3), cũng là hai kiểu thiết kế mà cuốn sách đã theo dõi từ đầu. Thiết kế analog làm việc ở mức bóng bán dẫn (transistor), như ở chương 5. Người làm analog vẽ từng mạch thành sơ đồ nguyên lý (schematic), tự chọn kích thước cho từng transistor trong đó, rồi chạy mô phỏng xem mạch có làm đúng việc của nó không, chẳng hạn vòng hồi tiếp có ổn định hay không. Sau đó họ vẽ layout bằng tay, từng hình một, một công việc riêng gọi là analog layout, rồi mô phỏng lại, lần này tính cả dây nối trong layout.
Digital design works in code, as in chapter 3. The logic is written at the register-transfer level (RTL) in a hardware description language, usually Verilog, now part of SystemVerilog, or VHDL, and simulated to check that the code does what it should, the step called verification. A synthesis tool then turns the code into a netlist of logic gates built from standard cells, and place and route sets the gates in rows on the die and wires them up, a stage the tool makers call implementation.
Thiết kế digital làm việc bằng code, như ở chương 3. Người làm digital viết phần logic ở mức RTL (register-transfer level) bằng ngôn ngữ mô tả phần cứng, thường là Verilog, nay đã nhập vào SystemVerilog, hoặc VHDL, rồi chạy mô phỏng để kiểm tra xem code có làm đúng việc của nó không, tức khâu kiểm định (verification). Tiếp đó, công cụ tổng hợp logic (synthesis) chuyển code thành netlist gồm các cổng logic dựng từ standard cell, và place and route xếp các cổng thành hàng trên die rồi đi dây cho chúng; các hãng làm phần mềm thiết kế chip gọi chặng này là implementation.
The views in plate 7.3 come from the company’s design flow. They show the kind of work each track does, not this chip’s own circuits.
Các ví dụ ở hình 7.3 lấy từ quy trình thiết kế của công ty. Chúng cho thấy mỗi nhánh làm những việc gì, chứ không phải mạch điện của chính con chip này.
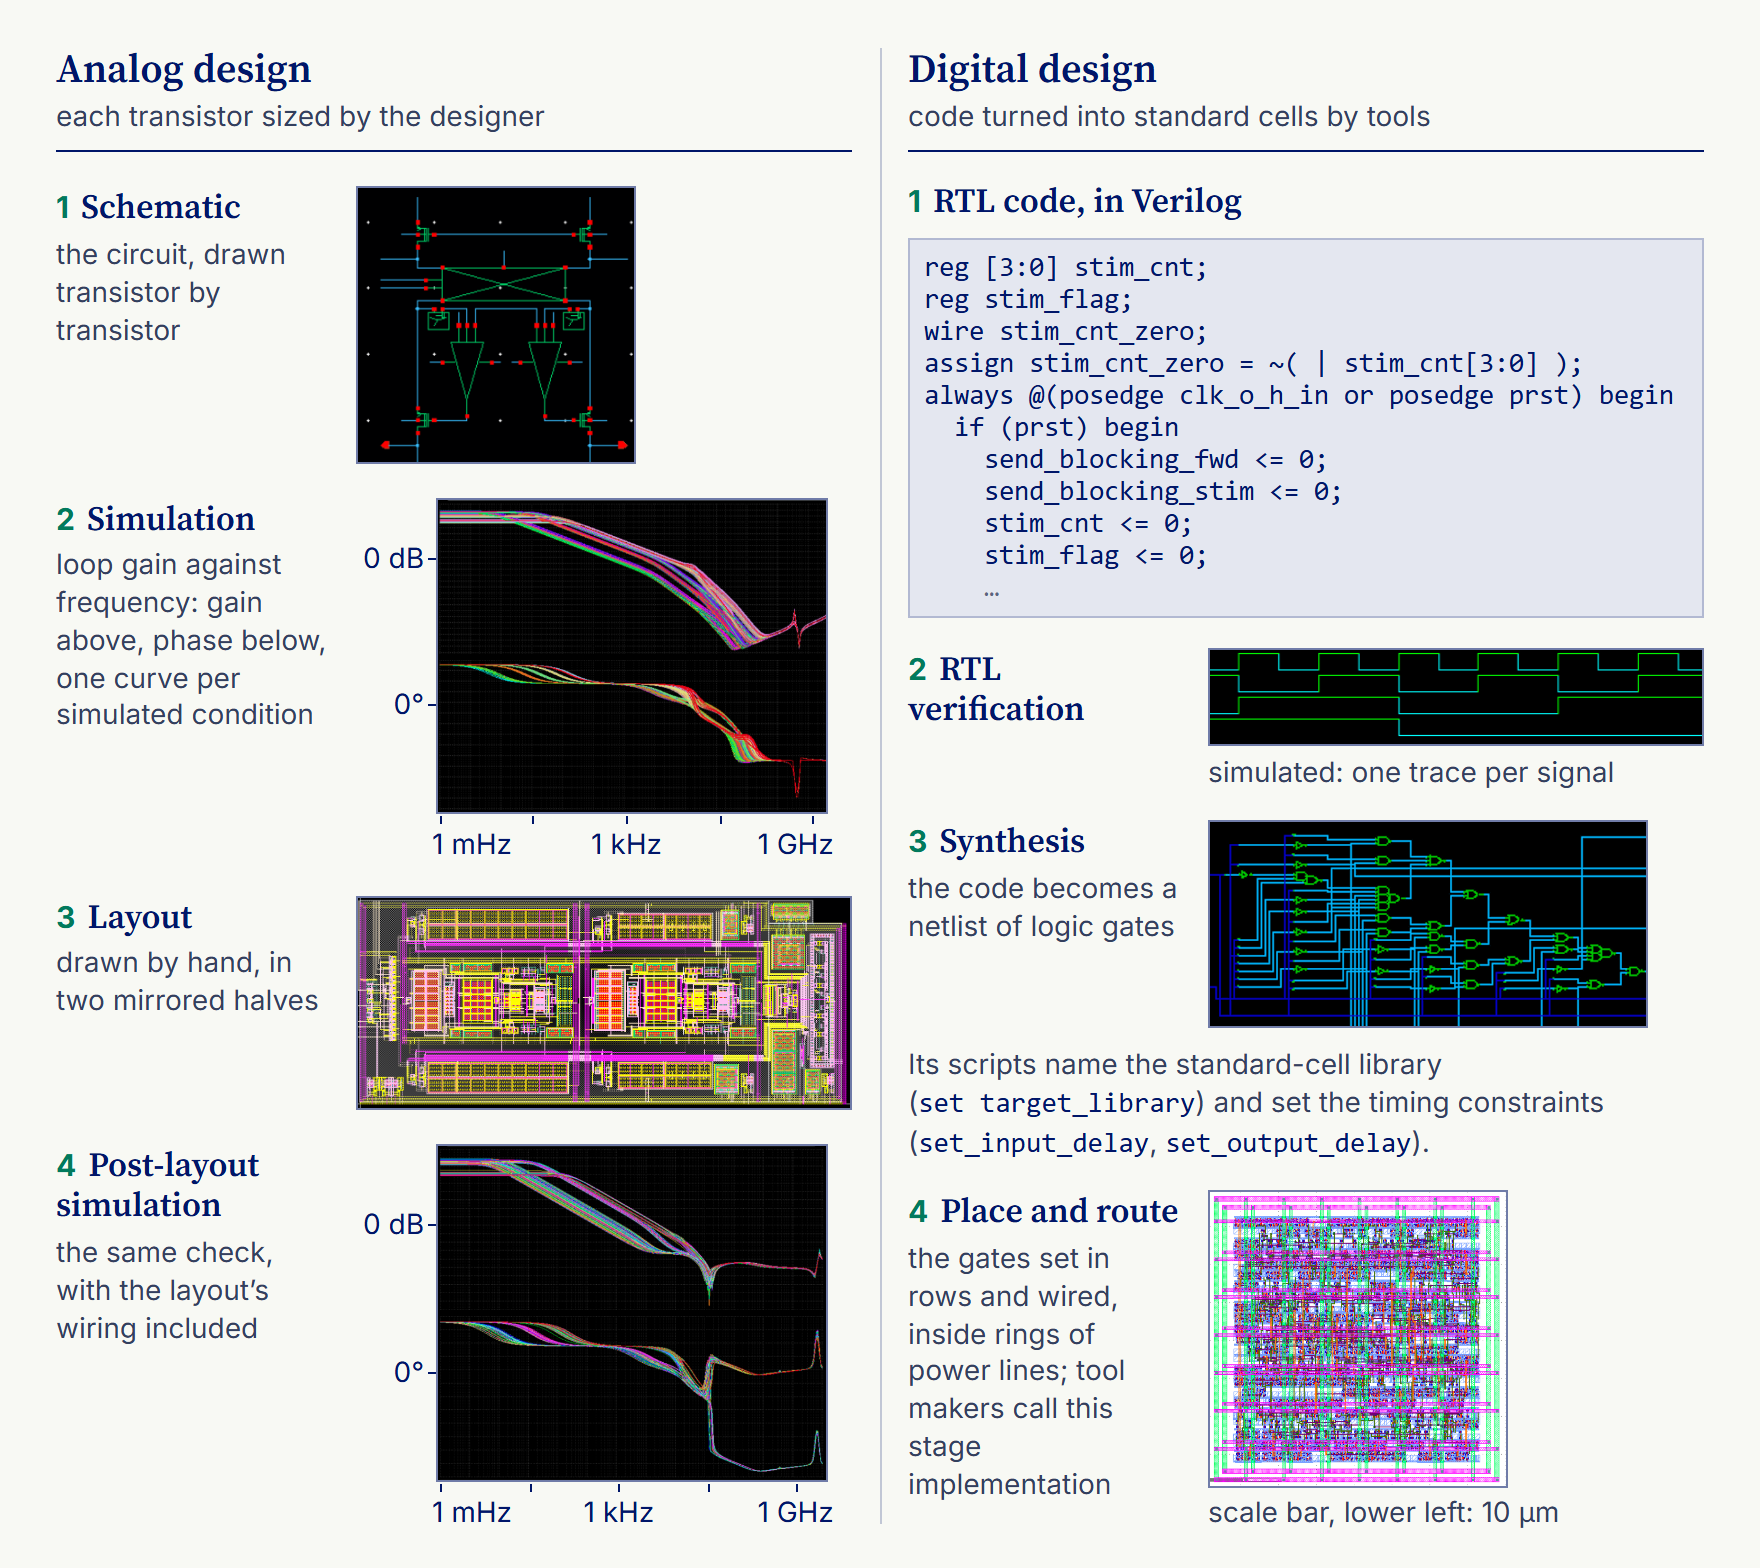
The two tracks meet on one die. A chip like this, with analog and digital circuits side by side, is called mixed-signal.
Hai nhánh gặp nhau trên cùng một die. Con chip mang cả mạch analog lẫn mạch digital như thế gọi là chip mixed-signal.
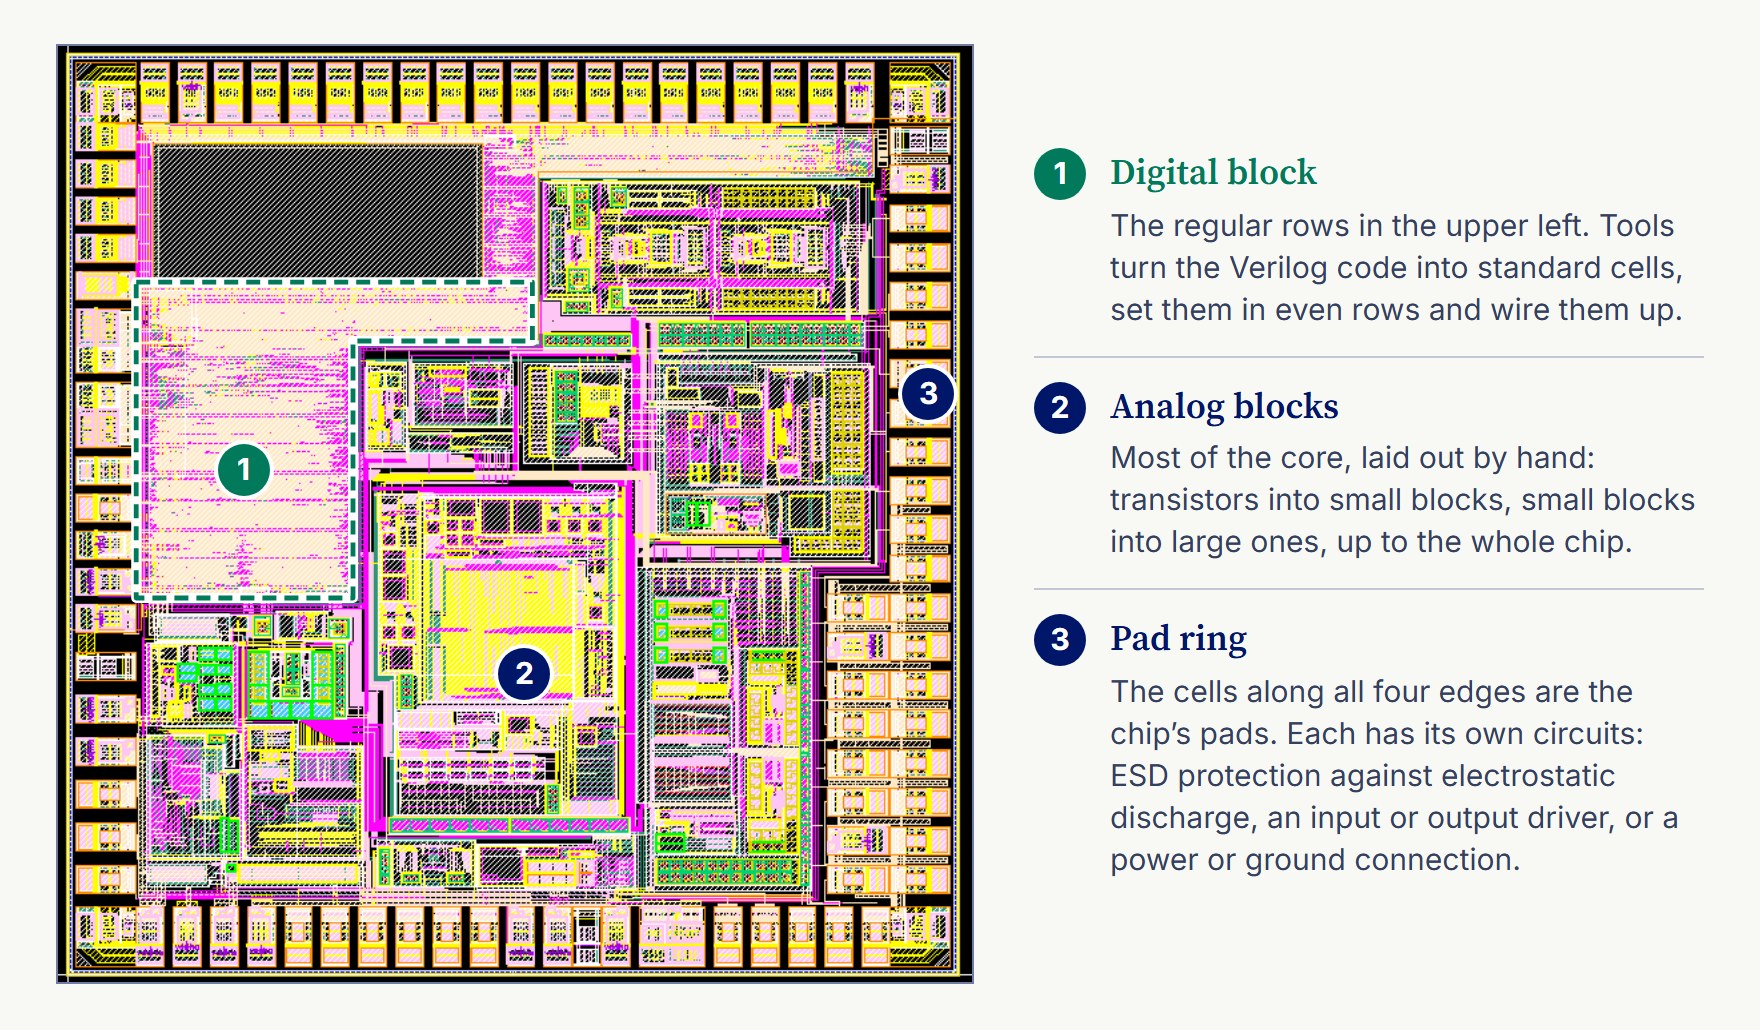
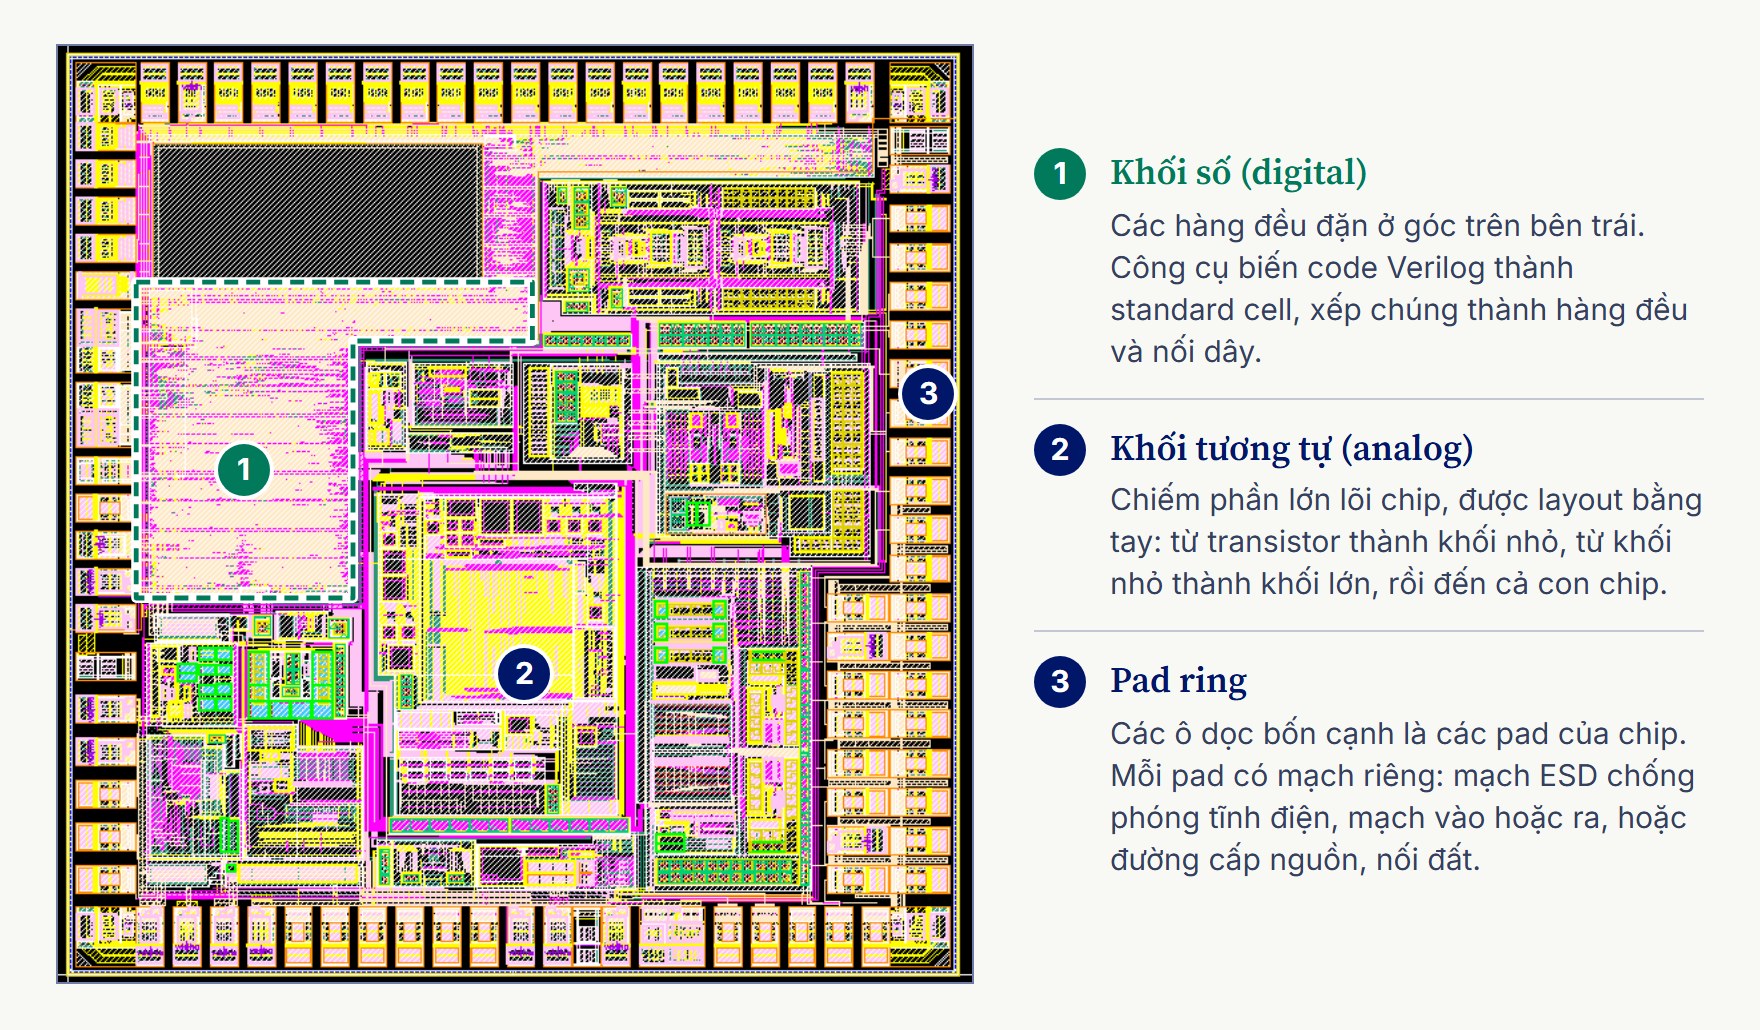
Plate 7.4 shows the layout of the joined chip. In the upper left, the digital block is a patch of even rows, the look of standard cells placed by tools. The rest of the core looks far less orderly: it is analog, laid out by hand from transistors into small blocks, small blocks into large ones, and on up to the whole chip. Around all four edges runs the pad ring, where the chip connects to the outside. Each pad has circuits of its own, for protection against electrostatic discharge (ESD), to carry a signal in or out, or to bring in power and ground.
Hình 7.4 là layout của cả con chip sau khi đã ghép hai nhánh. Ở góc trên bên trái, khối digital là một mảng những hàng đều tăm tắp, dáng vẻ quen thuộc của standard cell do công cụ xếp. Phần còn lại của lõi chip trông lộn xộn hơn nhiều: đó là analog, được layout bằng tay, từ transistor lên khối nhỏ, từ khối nhỏ lên khối lớn, rồi lên cả con chip. Chạy quanh bốn cạnh là pad ring, nơi con chip nối ra bên ngoài. Mỗi pad đều có mạch riêng: mạch bảo vệ chống phóng tĩnh điện (ESD), mạch đưa tín hiệu vào hoặc ra, hay đường cấp nguồn và nối đất.
Once the analog and digital blocks are joined, the links between them are checked, and the whole chip is simulated again to see that it works as one. Its full layout then goes through the same checks each block passed, against the foundry’s design rules and against the circuit. Only then is the design ready to leave the designers’ hands.
Khi đã ghép khối analog với khối digital, người thiết kế còn phải kiểm tra các đường nối giữa hai bên, rồi mô phỏng lại cả con chip để xem nó chạy đúng khi đã thành một khối. Sau đó toàn bộ layout còn phải qua đúng những phép kiểm tra mà từng khối đã qua, đối chiếu với quy tắc thiết kế của foundry và với mạch. Chỉ khi đó bản thiết kế mới sẵn sàng rời tay người thiết kế.